Tuesday, November 29, 2016

Grilled Cheese Sandwich


Ingredients:

  • 1 cup grated cheddar cheese
  • 1 small onion finely chopped
  • 1 tomato finely chopped
  • 1 small capsicum finely chopped
  • 1/4 cup finely chopped spring onion
  • Green chilies chopped
  • 2 tbsp chili sauce
  • Mayonnaise as required
  • Butter as required
  • 6 bread slices
Method:
  1. In a bowl combine together cheese, onion, tomato, capsicum, spring onion, green chilies and chili sauce. Mix well and set aside.
  2. Spread some mayonnaise on each slice of the bread.
  3. Spread the cheese mixture on a slice of the bread and place the other slice on top to complete the sandwich.
  4. Apply some butter on the slices from outside and keep it on a hot grill pan or any non stick pan.
  5. Toast the sandwich on both sides till crispy and serve hot.
Variations:
You can also add ingredients like boiled and shredded chicken, boiled and chopped egg, or any of your favorite vegetables. 

Tuesday, November 22, 2016

Kalmi Kabab


Whenever we hear about a kabab recipe we assume that it has to be done on a charcoal flame or in a pre-heated oven. Most commonly kababs are prepared that way, but slightly modifying the cooking method enhances the taste and the flavor.

In this recipe of Kalmi Kabab, I chose to cook the marinated chicken in a pot. This way we do have a full control over the meat and also it retains its moisture and gives more succulent result. Cooking any kind of kabab in a pot over slow flame is my favorite method of cooking. But I do miss that charred color and texture and also that smokey flavor.

The recipe is very easy and simple without too many spices. Also the most important step here is marinating the chicken twice. Do not look for a short cut by combining both marinades, as the result of the final dish will change.


Serves: 4
Preparation time: 1 hour (first marinate)
30 minutes (second marinate)
Cooking time: 20 to 30 minutes


Ingredients:
  • 500 gm Chicken Thighs (drumsticks)
  • 4 green chilies
  • 4 cloves of garlic
  • 2 inch piece of ginger
  • 1 tbsp kasoori methi (dry fenugreek)
  • 1 tsp shahi jeera (caraway seeds)
  • 2 tbsp yogurt
  • 2 tbsp cream
  • 1 tsp garam masala powder
  • 2 tsp amchur powder (dry mango powder)
  • 1/4 cup chopped coriander leaves
  • 2 tbsp cashewnut powder
  • 2 tbsp butter
  • 1 tbsp lemon juice
  • 1 tsp crushed black pepper
  • Salt
  • 3 tbsp cooking oil
Method:
  1. Marinate chicken pieces with salt, black pepper and lemon juice and set aside for 1 hour.
  2. In a grinding jar add ginger, garlic, green chilies, 1 tbsp kasoori methi and 1 tsp shahi jeera and make smooth paste.
  3. To the marinated chicken pieces add the masala paste, 2 tbsp yogurt, 2 tbsp cream, 1 tsp garam masala powder, 2 tsp amchoor powder and chopped coriander leaves. Mix well and again marinate for 30 minutes.
  4. Heat cooking oil and butter in a sauce pan. 
  5. Fry chicken pieces on high heat for 1 minutes on both sides. Place the lid and cook the chicken till it is almost done. Keep stiring and add few drops of water if needed. Taste and check the salt and other seasoning.
  6. Finally add 2 tbsp of cashewnut powder and for another 5 minutes.
  7. Serve hot with Mint Chutney
Note: This kabab can also be prepared in an oven or as a barbecue on a charcoal flame. In that case, add cashewnut powder along with the second marinate.

You might also like to try my other Kabab Recipes:


Tuesday, November 15, 2016

Turkish Meat Pide | Turkish Pizza


As the name suggests, this is a Turkish specialty. Pide is actually 'Pizza' in Turkish accent probably.
What makes this Pide different from Pizza is, that you will not find the usual tomato sauce or any of the Italian flavors. So this indicates that turkish food is a blend or may be we can say a 'fusion' of European and Middle Eastern Cuisine.

Pide comes under the category of 'Mezze' which means an appetizer. It is very easy to make this dish if you have a mastery over the magical dough. I call it magical because of its versatile nature, as you can use the dough to make a pita bread, or a pizza base and of course the 'pide' pronounced as 'pea-day'.


Serving Size: 4 to 5 person

Ingredients for the dough:
  • 3 cup of all-purpose flour (Maida)
  • 1 cup warm milk
  • 1 tbsp. dry yeast
  • 1 tsp sugar
  • 1 tsp salt
  • 1 egg
  • 3 tbsp. vegetable oil

Ingredients for the topping:
  • 500 grams of beef mince
  • 1 medium onion chopped
  • 2 cloves of garlic chopped
  • ½ tsp cumin powder
  • ¼ tsp black pepper powder
  • 2 tbsp. lemon juice
  • Salt to taste
  • 1 tomato chopped
  • ½ cup coriander leaves chopped
  • 2 tbsp. mint leaves chopped
  • 1 cup mozzarella cheese
  • 1 egg whisked
  • 3 tbsp. cooking oil

Method:
  1. In a bowl, mix together warm milk, yeast, egg, sugar, salt and oil. Mix everything together till well combined. Add flour little by little to make a soft dough. You may need ¼ cup more or less of flour while kneading the dough.
  2. Keep the dough covered in a warm place to rise and double in size.
  3. To make the topping: Heat oil in a pan and fry garlic and onion till soft. Then add mince, cumin powder, black pepper powder, lemon juice and salt. Cook till mince is fully done. Set aside and cool.
  4. Add chopped tomatoes, chopped coriander leaves and chopped mint leaves to the mince mixture and mix well.
  5. Pre-heat oven to 200 degree C.
  6. Place the dough on a floured surface and divide into two parts. Take each part and roll out into a large rectangle roti.
  7. Evenly spread 3 to 4 tbsp.  mince topping on the rolled out dough and fold the sides to give a shape of a boat.
  8. Sprinkle handful of grated mozzarella cheese on the mince topping.
  9. Brush the sides of the pide with whisked egg and pour the remaining whisked egg on the cheese.
  10. Bake the pide for 15 to 20 minutes.
  11. Cut into slices and serve hot.

Monday, November 14, 2016

Chicken Tikka Biryani


In my previous posts on biryani, I have always divided the whole procedure into steps. This is to make the procedure clear and more easy to understand. Preparing biryani is never a rocket science, but yes, it needs a little practice and some fine details that needs to be followed. For example, a good and perfect biryani depends on how well you have cooked the rice.

Whenever I prepare the rice for the biryani, I avoid doing any other work and just stand and wait for the rice to cook. After adding the rice to the boiling water, it takes approximately 8 to 10 minutes. So we need to be a little extra alert to this step. When the rice looks ready, we need to drain it as soon as possible to stop the rice from getting cooked any further. As far as the gravy is concerned, it should neither be a runny or of thin consistency nor too dry and thick. Try to maintain a nice medium consistency with lots of flavors and spices. Compared to other curries, a biryani masala needs more of onion and tomatoes.

The secret to a perfect biryani also lies in its dum-cooking procedure. While assembling the biryani together for dum, make sure that rice and gravy are both hot enough. And after assembling the dish for dum, the steam should appear within 10 minutes of cooking.


 Step 1: Chicken Tikka


Ingredients:
  • 1 l kilogram chicken (medium size pieces)
  • 2 tbsp. yogurt
  • 1 tbsp ginger & garlic paste
  • 1 tbsp red chili powder
  • 1 tbsp coriander powder
  • 1 tsp roasted cumin powder
  • 1/2 tsp garam masala powder
  • 1/4 tsp turmeric powder
  • 1 tsp crushed black pepper
  • 1 tbsp lemon juice
  • Pinch of red food color
  • 1 tbsp mustard oil
  • Salt
Method:
  1. Marinate chicken pieces with rest of the ingredients for minimum 2 hours. 
  2. Heat 4 tbsp oil in a saucepan and cook chicken till it is fully done. This will take about 20-25 minutes.
  3. Preserve the juices with the chicken. 


Step 2: Biryani Masala


Ingredients:
  •  2 medium onion chopped
  •  2 medium tomatoes chopped
  •  4 green chilies with slits
  •  1/4 cup mint leaves
  •  1 tbsp ginger & garlic paste
  •  1 tbsp red chili powder
  •  2 tsp coriander powder
  •  1 tsp roasted cumin powder
  • 1/4 tsp turmeric powder
  • 1/2 cup yogurt
  • 1 tbsp kasoori methi (dry fenugreek leaves)
  • 1/4 tsp garam masala powder
  • 1 tbsp lemon juice
  • 1 cup chopped fresh coriander leaves
  • Whole Spices: 2 " piece of cinnamon, 3 cloves, 3 cardamom, 1 bay leaf, 2 tsp shahi jeera 
  •  Salt 
  • 1/2 cup cooking oil 
  • 1 piece of coal


Method:
  1. Heat 1/2 cup cooking oil in a saucepan and add all the whole spices.
  2. Add 2 onions chopped and fry till light golden, along with 4 green chilies (with slits) and chopped mint leaves.
  3. Add 1 tbsp ginger & garlic paste and fry 1 minute. To this add 2 tomatoes chopped and cook till it is soft.
  4. Now add all the spice powders like 1/4 tsp turmeric, 1 tbsp red chili powder, 2 tsp coriander powder and 1 tsp cumin powder. Cook on low flame for 5 minutes till aromatic and oil separates.
  5. Then add 1/2 cup yogurt, 1 tbsp kasoori methi, 1/4 tsp garam masala powder and 1 cup fresh coriander leaves. Place the lid and cook for another 5 minutes. 
  6. Add this biryani masala to the chicken tikka pieces, mix well and cook for another 5 minutes on low flame. Taste and adjust the seasoning (add water and salt if needed).
  7. Place a piece of foil on the surface of the gravy and keep a hot burning coal on it. Pour a tsp of ghee over the coal. Cover with an air tight lid to trap the smoke. Leave it covered for 15 to 20 minutes.
  8. Open the lid and discard the foil and coal piece. 


Step 3: Biryani Rice


For Rice Preparation
  • 4 cups of long grain basmati rice
  • 2 bay leaves
  • Big piece of cinnamon stick
  • 5 cardamom
  • 1 tbsp vinegar
  • Salt to taste
  • 4 tbsp oil
  • Enough water to cook the rice.

Method for cooking rice:
  1. Wash the rice thoroughly and soak for 30 minutes in water.
  2. Heat a large vessel filled with enough water. Bring to a boil and add 2 bay leaves, cinnamon stick, cardamom, vinegar, salt and oil.
  3. Add the soaked rice and cook till 90% done. When you check the rice, it should be firm and not fully cooked.
  4. Drain the rice in a colander and set aside.

Step 4: Dum Cooking

Ingredients:
  • 1 cup fried onion
  • 1 cup chopped coriander leaves
  • 1/4 cup milk + 1 tsp rose water + Pinch of yellow colour
  • 1 tsp garam masala powder
  • 2 tsp shahi jeera
  • 4 tbsp. of ghee or butter

Dum Cooking:
  1. In a large sauce pan add all the chicken tikka masala as first layer.
  2. Spread half of the cooked rice and sprinkle with the few drops of milk + rose water + colour mixture. Sprinkle a handful of coriander leaves and fried onion along with pinch of garam masala and 1 tsp shahi jeera. 
  3. Repeat the step 2 with rest of the rice.
  4. Make some deep dents in the rice so that the steam can easily circulate. Pour some ghee or butter over the rice and seal the vessel with a foil and a tight lid. (to avoid the steam from escaping)
  5. Cook on medium high heat for 10 minutes. You will see the foil has puffed up due to the steam. Switch off the gas and let the biryani stay covered for another 15 minutes.
  6. Serve hot.


Thursday, November 10, 2016

Mint Chutney | How to make Mint Chutney


I have a list of kitchen preparations which I usually do once in a week. Most of the time it is just after I have arrived back from my weekly grocery shopping. Sorting out things and storing them in the right place makes cooking as well as my life much easier and stress free.

One such preparation I always like to do is to prepare and store is a 'multi purpose' mint chutney in my refrigerator. Mint chutney is a quick fix for making a snack or a quick simple sandwich.

Ingredients: 

(grind together)

  • 1 tsp grated garlic
  • 1 tsp grated ginger
  • 2 green chilies
  • 1 tbsp lemon juice Or 1 tsp tamarind pulp
  • Salt
  • 1/2 tsp cumin powder
  • 1 cup mint leaves or little more
  • 1 cup green coriander or little more
  • 1 slice of bread soaked in water or 1 tbsp roasted chana dal
Store this chutney in a dry glass container up to 4 to 5 days in the refrigerator. You can also pour into the ice tray cubes and freeze.

*Updated this post (1/2 tsp cumin powder) - 14/11/2016

Also try my other chutney recipes on blog


Sunday, November 6, 2016

Barbecue Menu Plan (Non-Veg & Veg)


As we start to feel the difference in our daily weather, that early morning sight of fog and mist and we can hardly notice those clear rays of sun; all this indicates that winter has finally arrived. For some countries it could be dreadful, with blanket of snow covering the whole city. But in those Middle Eastern countries, winter is a season of family get togethers, picnics and mostly out door weekends. Yes I am talking about life in UAE, as I live here and would like to connect more with this kind of climate. Not many to be seen in the Malls as the crowd now shifts their venue to the beautiful parks and beaches. 

Now the question arises as to what to prepare for a barbecue party. Everyone has their own choice, but just to give a brief idea and menu options, I have prepared a sample menu for both vegetarians and non-vegetarians.

Barbecue Non-Veg Menu Plan


Click on the name of the dishes for recipe.


Barbecue Non -Veg Menu Plan


Click on the name of the dishes for recipe.


Barbecue Vegetarian Menu Plan


Nizami Veg Kabab

Click on the name of the dishes for recipe. 

Ginger & Garlic Paste | How to make ginger & garlic paste


Ingredients:
  • 500 gm ginger
  • 500 gm garlic
  • 1 tbsp fennel seeds (Badi Saunf)
  • 1 tsp turmeric powder
  • 2 green chilies
  • 2 tbsp olive oil
  • 1/2 cup or little more boiled and cooled water
  • Salt (approx 2 tsp)
Method:
  1. Peel ginger & garlic and chop into small pieces.
  2. Add to the grinding jar, along with all other ingredients.
  3. You can also grind everything in small batches till fine and smooth. (Add little water at a time)
  4. Store in an air tight container in refrigerator.
  5. Stays fresh for up to 1 month.


Thursday, November 3, 2016

Banana Buns


Again I have come up with yet another Mangalorean speciality. You will find this dish on every menu card in a Mangalorean Restaurants which is normally served as breakfast.

The secret to this recipe is the extra ripeness of the bananas. If you want good results, then you need to set aside 2 or 3 large size bananas aside till they go black from outside and still firm and sweet from inside. But only disadvantage of this dish is, that it is deep fried. But there is no harm if you get to indulge in such a thing once in a while.

There are other recipes for over ripe bananas which are not deep fried, like you can check my recipes of Banana Bread and Chocolate Chip Banana Muffins.


Serving Size: 15 to 20 Buns
Preparation & Standing Time: 5 hours
Cooking Time: 30 minutes (approx for rolling & frying)


Ingredients:
  • 3 ripe bananas
  • 1/2 cup yogurt
  • 1/2 cup sugar (or 1/2 cup grated jaggery)
  • 1/2 tsp cumin seeds
  • 1 tsp baking soda
  • 1 tsp salt
  • 4 cups plain flour (Approx - little more or little less)
  • 3 tbsp of ghee or melted butter
Method:
  1. In a blender jar, blend together - mashed bananas, yogurt, sugar and cumin seeds to a smooth mixture. ( The consistency of this mixture will be like a smoothie)
  2. Mix together - plain flour, baking soda and salt separately.
  3. Take a large mixing bowl and pour the banana mixture into it. Add plain flour mixture little at a time along with melted butter and make a smooth soft dough. (Add 1 cup flour at a time...mix and then add another cup...and so on. You might need a little more flour than what is mentioned or may be little less)
  4. Keep the dough at room temperature for 4 to 5 hours. (more than that, you need to store it in the refrigerator)
  5. Heat 5 cups of cooking oil in a deep sauce pan (kadhai).
  6. Divide the dough into small lemon size balls.
  7. With help of a rolling pin (bhelan) roll out each part into a small disc (like puri) but by using only oil.
  8. Deep fry the buns in medium hot oil for 1 minute on each side or till they are fully puffed up.
  9. Serve the buns with cheese spread or fresh cream.

Wednesday, November 2, 2016

Paneer and Capsicum Paratha


All are familiar with the recipe of Paneer Paratha, but just to overcome the blandness of paneer, I decided to add some finely chopped capsicum. What I like about this paratha is that the stuffing needs no cooking on the stove. It can be made in a bowl, unlike my previous recipe of Aloo Paratha, where we need to cook the potato stuffing, cool it and then make the paratha.

If you have Paneer in your refrigerator, then this paratha can be a quick fix in case if you unexpected guest, a quick dinner or even an easy option for a lunch box.

Serving Size: Makes 5 Parathas
Preparation Time: 30 minutes 


Ingredients:

For the dough: (combine all ingredients to make a smooth soft dough)
  • 2 cups wheat flour
  • 1 tbsp oil
  • Salt to taste
  • Water as required to make the dough.
For the Paneer stuffing:
  • 300 gm grated paneer
  • 1 medium size capsicum finely chopped
  • 1 tsp grated garlic
  • 1 green chili finely chopped
  • 1 tsp red chili powder
  • 1/2 tsp cumin powder
  • 1/2 tsp amchur powder (dry mango powder)
  • 1/2 cup chopped coriander leaves
  • 3/4 cup grated cheddar cheese (optional)
  • Salt
To make paratha:
  • Divide the dough into small lemon size balls.
  • Roll out each ball to a thin and medium size roti. Place the Paneer stuffing in the center and spread it evenly.
  • Roll out a another similar size roti and place it over the paneer stuffing. Press the edges to seal.
  • Gently place the paratha on pan and roast on both sides by adding few drops of cooking oil.


Tuesday, November 1, 2016

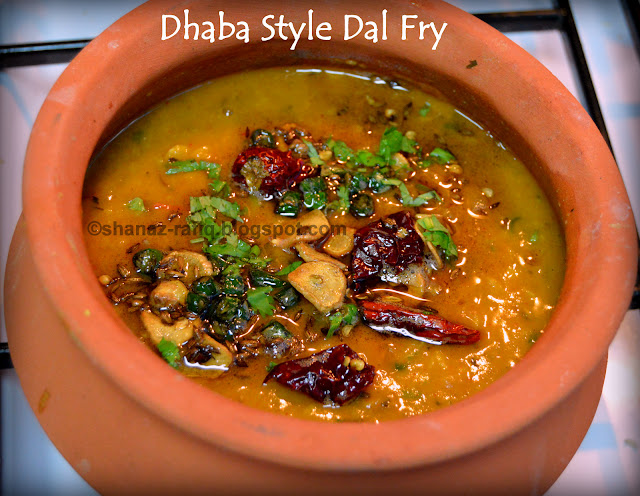
How to make Dhaba Style Dal Fry


Ingredients:

  • 1/2 cup Chana Dal
  • 1/2 cup Toor Dal
  • Pinch of turmeric powder
  • 5 to 6 cups of water
  • 1 tsp cumin seeds
  • 1 tbsp chopped garlic
  • 1 tbsp chopped ginger
  • 1 medium onion chopped
  • 1 medium tomato chopped
  • 2 green chilies chopped
  • 1 tsp red chili powder
  • 1 tsp cumin powder
  • 1 tsp coriander powder
  • 1 tsp amchur powder
  • 1/2 tsp garam masala powder
  • 1 tsp lemon juice
  • 4 tbsp cooking oil
  • Salt
For Tadka:
  • 1 tbsp cooking oil
  • 1 tbsp butter
  • 1 tsp cumin seeds
  • 1 green chili chopped
  • 2 cloves of garlic sliced
  • 1 dry red chili
Method:
  1. Wash and soak chana dal and toor dal for 30 minutes. Boil in a pressure cooker with 5 cups of water, pinch of turmeric and salt.
  2. Heat 4 tbsp cooking oil and add cumin seeds. When it crackles, add chopped garlic and ginger. 
  3. Then add chopped onion and fry till light brown followed by tomato and green chilies. Fry for 1 minute.
  4. Add all the spice powders - 1 tsp red chili powder, 1 tsp cumin powder, 1 tsp coriander powder, 1 tsp amchur powder and 1/2 tsp garam masala powder. Fry the masala well by adding few drops of water till the raw smell disappears. (fry on low flame for 5 minutes)
  5. Now add boil lentils and stir well. Season with salt and lemon juice. Cover and cook the dal for 10 minutes on low flame.
  6. Prepare tadka by heating 1 tbsp cooking oil and 1 tbsp butter in a small pan. To this add cumin seeds, chopped garlic, chopped green chili and dry red chili. Saute for few seconds and pour this over the dal.
  7. Serve hot with Roti or steamed rice.